Showing posts with label rongxianplace. Show all posts

Friday, February 19, 2016

Homemade Beancurd Tart

Alright this post were meant to be up last year because I made my own Beancurd Tart around Oct/Nov period. Pardon for the delay! For those who have my FB/Instagram would have already seen it way back then, oh well life's still busy even after the customary wedding is over. 

Nevertheless, I shall share recipe I used to make Beancurd Tart and also my personal experience.

The very first time I did the Beancurd Tart, it was a ultimate failure. I used those ready-made tart crust from phoon huat and to my horror, I bought the wrong type -_-". The tart crust was meant for Portuguese Eggtart (cripsy cripsy kind) and the tart crust don't taste similar to those being sold outside. I think I sort of under-cooked it. Anyway, I threw all away(even though the beancurd part was successful) on the first attempt.

Oh well, when it comes to baking, it really needs lots of patience just to get it right and with that I meant by attempting it again and again. 

I continued searching for recipes online and I came across quite a few recipes which involves making the tart from scratch. It doesn't seems difficult hence I attempt to do the tart myself this time round then. 

Here's the recipe for the tart crust adapted from: http://mymindpatch.blogspot.sg/2014/08/soya-milk-tart.html

Ingredients

90g unsalted butter, softened
45g icing sugar
30g beaten egg
150g all purpose flour
20g corn flour
1/4 tsp salt

Instructions

1. Loosen all purpose flour, corn flour and salt by stirring with a hand whisk.
2. Cream the softened butter till it becomes pale yellow. Add in the icing sugar and whip for about 5 minutes into a light cream. 
3. Slowly add in the beaten egg and mix well.
4. Fold in the flour mixture from (1) using an spatula till the mixture turns into a soft smooth dough.  Transfer the dough into a plastic bag and shape into a long dough. Let it chill in the fridge for 1 hour before moulding.
Avoid over mixing which will result in a tough crust.
5. Divide the dough into 12 equal portions.

Just some side information, I used a hand whisk throughout.

Anyway, I used Method 1 to create the tart shape instead of Method 2 as I do not have a cookie cutter at home.

1) Roll the dough into a ball and place inside a 7cm round mould.
2) Use your thumbs to press the dough to shape to the contour of the mould.
3) Scrap off the extra dough.
4) Use a fork to prick some holes at the base. 
5) Bake the tart shells in a preheated oven set at 180 degree Celsius for about 15 to 18 minutes, or till the tart shells turns slightly golden.

So that's how my tart shell look like after baking..


They smells really good. To be exact, it smells like baking biscuits :)


Derp and I took a few bites to try and we were very satisfied with the taste and texture.
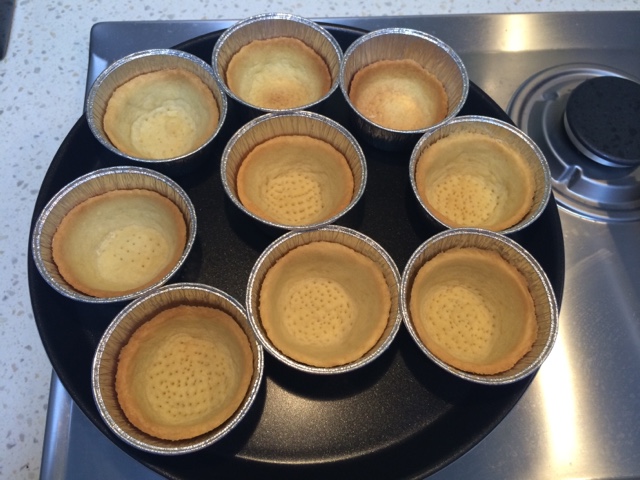

All the crust made that day.

Much excited because it was a success. I was more motivated to continue making the beancurd part then because I'm half way there

Moving on to making the beancurd ...

Again, the recipe was adapted from: http://mymindpatch.blogspot.sg/2014/08/soya-milk-tart.html However, I did made some modification to it because I do not have all the ingredients stated if not different ingredient being used to substitute it.

Here it goes..

Soya Curd Filling

It is recommended to use those non-refrigerate types of carton soya milk. From my past experience, those soya milk which need refrigeration, have problem coagulate using this recipe. -> I used Yeos Soya Milk(those 1 litre type, costs around $1 if I never remember wrongly)

Ingredients

450g low sugar soya milk
10g sugar
1 tbsp milk powder ( I didn't use this as I do not have any milk powder at home)
1/2 tsp agar agar powder (I used instant jelly powder from Phoon Huat)
50g low sugar soya milk
1 pandan leaf (optional) (I didn't use this too)

Instructions 

1. Heat 450g soya milk in a pot at medium low heat.
2. In a bowl, mix milk powder, sugar and 1/2 tsp of agar agar powder together. ->As I mentioned earlier, I omit the milk powder and for this step, I add in roughly 2 tsp of the instant jelly powder.
3. Pour 50g of soya milk to mix with the mixture in (2). Let the mixture stands for about 10 minutes to allow the agar agar powder to absorb the moisture.
4. Pour the mixture from (3) into the pot of hot soya milk. Stir regularly to facilitate the sugar and agar agar powder to melt. The agar agar powder will melt around 100 degree Celsius. Ensure there is no tiny grains of undissolved agar agar to give a smooth texture curd.

You may add in a piece of pandan leaf to enhance flavour.

5. To test whether the mixture is ready, scoop a tablespoon of the soya milk mixture to a cool saucer. Place the saucer in the fridge to chill for 2 minutes. If the mixture coagulate after 2 minutes, you can stop heating the mixture.
6. Pour the warm mixture into the tart shells and allow them to cool to room temperature before transferring to the fridge to chill.
7. Allow the tarts to chill for 15 minutes. The tarts are best consumed about 5 ~ 10 minutes after leaving the fridge  :)

Keep the unconsumed tarts in a closed container to prevent the bean curd from drying up.


Just to take note, how 'q' you want your beancurd part to be depends on how much instant jelly powder/agar agar powder you add. Initially, I only added in 1/2 tea spoon jelly powder and they don't coagulate that well.

Hence I had to slowly add in till I get the texture(making sure they harden after it's being placed in the fridge). No harm adding in a little more rather than not enough because those powder needs time and heat to be dissolve.


After pouring the filling into the tart..


Before putting them in the fridge :) 

The very next morning, I can't wait to try it to see how it turns out..


The overall taste was good (especially the crust), texture of the beancurd can be improved as I find it to be slightly too soft but I'm glad they did 'harden' up. Perhaps I've to experiment putting in more instant jelly powder so as to get the texture right. 

That's all for the beancurd tart making process :) I'll need more time to perfect the tarts and if I ever did it, I will share it here then! I personally feel beancurd tart is a manageable homemade dessert for beginners. So do try it if you are like me who loves beancurd much! Who doesn't right? :) 

Sunday, October 18, 2015

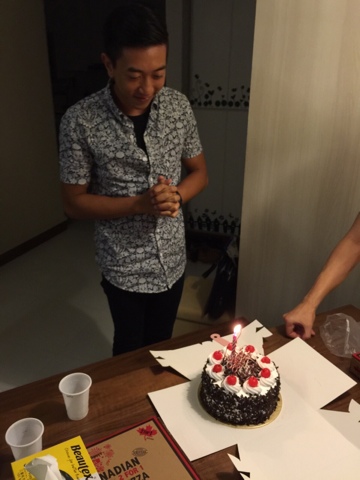
Birthday celebration in the house :)

2 months ago, we celebrated Derp's youngest brother's 20th birthday at our place. 

It's been awhile since we hold such gatherings and we took quite sometime to clean up the whole place, making sure it's clean and neat enough. In the past, we had housewarming sessions nearly every week and such sessions 'forced' us to keep the place clean and tidy. After that, we were quite slack and 'bo chup' in general.

Gatherings at our place sort of 'force' us to tidy the house if not on normal days, the whole place will feel as though someone broke in lol. So sometimes, gatherings is good for us and the tidy-ness will last for a few days before it back to normal again. 

It was a simple dinner affair with pizza and home prep nuggets and fries. 


All the yummy food that day for the 6 of us :) 

The food was a little too much and we couldn't finish it lol. 

After dinner, we played an hour of game on the PS3 in our living room before cutting the cake.


The birthday boy.

Still a boy because he have not reached 21 yet!


With his gf. 


Making his birthday wishes


Cutting the cake 


Brothers


A more formal shot before the casual ones. 


Family #welfie


And one more.


The one piece polaroids taken that day :)

All very nicely taken and it's in our favourite one piece character's polaroids! 

As we grow older, birthday celebrations tend to be less fanciful because what matter most is everyone come together for the gathering even if it means nua-ing around talking rubbish/play games :)  

Tuesday, September 22, 2015

Homemade Snowskin Mooncakes

The Mid Autumn Festival is just around the corner and to be exact happening in less than a week time! Just weeks back (on the night of Singapore's General Election), I tried making snowskin mooncakes. 

Many baking enthusiasts have started making mooncakes, be it traditional type or snowskin type few months ago. Practice makes perfect :) 

After seeing so many homemade mooncakes post on the Facebook baking group, it sparked my curiosity. Hence, I went to find out how to make snowskin mooncake because everyone seemed to be doing it. It wasn't as difficult as I thought it will be because the ingredients are simple as it requires just a few items.

I even saw people making Hello Kitty shape snowskin mooncake and sharing it on Facebook. It looks just like those Hello Kitty mooncake that Breadtalk is selling(price near to $60 for 4 Hello Kitty moon cakes), totally not worth to buy it! Why not make it yourself? :) 

To be honest, the ingredients for mooncake are quite affordable and it can be used to make lots and lots of mooncake (especially the filling). 

It was a last minute decision to make snowskin mooncakes together with my BIL and SIL. They were already coming over for dinner on GE night and decided on cooking Army Stew for dinner (will blog about that some other time). Making mooncakes have been added to the itinerary since the mooncake mould came earlier than expected!


This is the mooncake mould which I've waited excitedly for :) 

The mould can be bought from here. They may not sell the mould at the cheapest price on Qoo10, but the delivery is really fast and the quality of the mould is as promised. No regrets paying slightly more for the fast delivery.

Hereby introducing you the ingredients we have used to make Snowskin Mooncake :)


Ingredients for Snowskin Mooncake:

1) Sugar Free Green Bean Paste
2) Sugar Free Red Bean Paste
3) Snowskin Premix
4) Shortening(the one in the tupperware)
5) Green Pandan and Purple Yam flavour coloring. 

All these can be bought from Phoon Huat. You may visit their website as they have lots of branches around Singapore. We decided to make 2 different flavors of mooncake hence that explains the 2 different coloring and 2 different paste. 

Phoon Huat has this snowskin premix which helps save time. If you do not wish to use the premix, you can actually substitute with Kao Fen( Glutinous Rice Flour) and Icing Sugar. The advantage of not using the premix will be you can adjust the amount of icing sugar to your own liking :) You can google for the quantity of each ingredient if you will like to. 

This is the quantity that we used for the mooncakes (Yields around 20 mini mooncakes, I can't remember exactly the quantity):

1) Snowskin Premix 290 gram
2) Shortening 56 gram (Can used slightly lesser as this is fats! But not too little if not the whole dough will be too dry )
3) Desired Coloring 10 gram.
4) Water 140ml.

The instructions is pretty simple and is as follow:

1) Pour out the snowskin premix into a bowl.
2) Mix coloring and water together.
3) Get ready the shortening while letting the dough to rest for 15mins.
4) Mix snowskin premix with coloring.
5) Add in shortening.
6) Prepare paste and divide into 24 gram each (we used 20gram each because we doesn't have a digital weighing scale).
7) Divide dough into 20 gram each.
8) Flatten the dough and wrap the filling in it.
9) Freeze it for roughly half and hour.


This is the video from Phoon Huat teaching you how to make snowskin mooncake. So for better illustration, you can watch it! :) 

After typing so much, here are some of the photos from behind the scene! We lay baking sheets all over the dining table to prevent dirtying it. We did all this while waiting for the announcement of GE results till the results are announced. The ingredients that we bought were enough for us to make lots of mooncake.

We took turns to knead the dough but frankly speaking, it requires some strength to do it. Not as easy as it seems on the video lol.I couldn't even out the coloring so I passed on to the next person to do it. So yea, you can imagine the dough went through quite a few of our hands lol!


Starting it was quite dry and we thought something went wrong. I remember at some point of time we added a little more shortening to reduce the dryness just so to get the smooth dough. 


The dough seems much better now. 


The only behind the scene photo. Our hands are all too oily! They may not look oily at all but it's actually very oily. In short, mooncakes are really sinful especially snowskin mooncakes! 


Our first batch. 

We didn't make the mooncakes that fast because there's only 1 mooncake mould so we took turns. 

And here comes the GE inspired mooncakes by the 2 guys lol. Seems like they got bored using the cute kind of mould.


No prize for guessing which political parties are those. :)


Another familiar looking political party logo.

The 2nd batch of mooncakes with a different coloring being used. 


More political parties' logo appearing lol. 


All the GE inspired mooncakes made that night. #GE2015

We did tried a few mooncakes that we have made and they tast better that what we expect (even though the appearance may not seems to be right lol). 

I gave it out to some friends who came to our house the very next day for wedding-related stuff and they praise that it was well made.

It seems that the mooncake making session was successful. Perhaps next year we should learn how to make durian snowksin mooncake instead because that will really save us lots of money then! 

That's all for my homemade mooncake entry and Happy Mid Autumn in advance! 

Thursday, April 23, 2015

Gathering with the Uni Buddies!

I finally invited my buddies over to my new place after so many months of moving in. It's nearly a year after I move in very soon. We still have some friends who have yet to visit our place yet hahah! 

The last time I met them has got to be at Guo Liang's wedding. I still remember rushing down to his wedding after a 10km race last November!

We wanted to meet up sometime after Guo Liang's wedding but never had the chance to. We finally found a common time and so we had a simple lunch affair at my place with Canadian pizzas. I airfried wings and nuggets for them too since they were all guys and I reckon they might not feel full enough.

The guys bought bubble tea for us :) as it was a really hot afternoon!  

We had a good time catching up with each other over lunch at my place. After lunch, we decided to play with the Go Pro camera.

Darwis brought his GoPro camera along hence we had a good time 'playing' with it. Makes me feel so tempted to get one too. The camera is sooooo small yet the resolution of the photos is really good and able to capture my whole house due to it's wide angle.


Test shot and it simply capture my whole living room. lol

Some #welfie shots..


Pardon for what's on the tv! And this has become our new whatsapp group icon lol. No idea why we pose till like that but I suppose trying to capture the whole house in the photo.

Hope to meet up with them soon but I think it will be during Guo Liang's housewarming since he's getting his keys in few months time. Looking forward to "house hopping"

Saturday, February 14, 2015

The Final Outcome of the Home Renovation!

Time to update on the final installment of my house renovation. Pardon for the long delay but I need time to put everything together. Have been busy with the upcoming CNY too so I'm sorry for the long wait!

Previously I stopped at Week 4 of my renovation works, after which it was weeks of touching up/cleaning before the renovation finally comes to an end. Just incase you have not read, I've also blog about my thoughts and answers to commonly asked questions about home renovation. So now, here's the final post about it :)

This is my floor plan for recap purpose before I go further into it..


Our home concept which we send to the 3 IDs we met at expo back then...


Derp used photoshop to do up this to show them our idea.

Below are our ideas back then..

Theme: Modern Scandinavian (If you do not know what it mean, in layman terms it mean everything as wood as possible)

LIVING ROOM 
- Hung on wall
- Able to tilt to face dining area (Eventually we didn't have this as we are able to watch the tv quite comfortably at our dining table)
- A suspended TV console and some platforms for photos/deco. (We only had a suspended tv console)

SHOE CABINET (preferably as a partition for privacy)

- Full Height shoe cabinet (Top part as storage, Bottom part shoe rack, Middle portion would be empty to put the keys/miscellaneous items.
- A settee (Till date, we are still finding for a suitable one)
- A full length mirror near to the door for final checking before leaving the house. (We got a full length mirror from ikea and fix it up there)

KITCHEN 

- Theme: Sleek, clean and contemporary. Generally white and brown.
- Built in cabinets on one side of the kitchen, not both side.
- A L-shape kitchen-top concept.

MASTER BEDROOM

- A color theme to match the strip timber flooring
- Walk-in Wardrobe to be L-Shaped Full-height, with a dressing table. (No dressing table in the end due to space constrain)
- A full length mirror next to the air-con ledge window. (We got a mirror from ikea to fix it there too)
- Queen Size Bed
- Baywindow cabinet with storage function (We didn't had this but instead we have 2 bedside table, one on each side)


LEISURE/GAMES ROOM

-  A work area for 2 computers
-  A tv console for PS3/Xbox and etc.
- Approx. 4 velvet chairs and various bean bags. (We have 2 bean bags only due to space constraint)
- A generally dark room. 

Additional notes on leisure/games room: 

- To hack away part of the walls to be made into glass and glass door entrance to the room. 

GUEST BEDROOM

- A bed (Till date, we have yet to put a bed inside yet)
- Bayside window cabinet with storage function

MASTER BEDROOM TOILET

- Colour theme:  Sleek, Clean, White
- A simple glass Shower screen with no doors. Just to block water from spraying onto the toilet bowl
- Small built-in platforms for shower foam & shampoo. (2 to 3) (In the end, we don't need this as the design of our toilets come with a latch which have a depth to put all this stuffs)

We chose all the laminates for the various carpentry before the ID do up the 3D designs. They will do accordingly base on what you have chosen so as to give you a better overall feel of the house. 

So here comes my 3D design (We changed quite a few times but it were minor changes. Our ID didn't charge us for that. Do find out from your ID whether do they charge you if you are unhappy with the 3D design and require for it to be change) : 

Living Room


In actual fact, the TV is another direction but this were to show us roughly how it will look like.


This is the actual placement. 
Leisure/Games room


This final product of this room is much prettier than the 3D design. At least that's what I feel haha! 

Guest room 


We only do up the bayside window storage for this room. 

Kitchen


Master Bedroom


After looking at the 3D image, let's look at the actual pictures of the house taken by yours truly. Took this the night before 1 of the housewarmings we had when the house is in it's neatest form lol. 

I'll go through the items bought in details (I'll try my best) in every photo. Will share the links if there's any at the end of my blog entry! 

Living Room


Overview of the living room (standing at the entrance of the kitchen) 


- 3 downlights and 1 stretch of cove lights are from Tao Bao 

- Those printings on the walls are bought from tao bao and DIY-ed by us :) 

- Dining table and Sofa from La Cafa Furniture and Design. 

- Dining table light from Ikea. 


- Stickers on the electrical box from Tao Bao


Kitchen


Eubiq bought from Eubiq Concept Store @ IMM 

Service Yard


Rilakkuma laundry bag bought from Tao Bao

Guest's Toilet


We didn't do anything much to this toilet since the sanitary fittings came with the HDB flat. 

- Mirror and toiletries stand  from IKEA
- The hair dryer holder and towel/clothes hanger from Tao Bao. 
- LED strip lights from Tao Bao.

 We also use the LED strip lights for the toilets as well as for the masterbedroom cove lights.


And this is how the toilet looks like in normal light. 

Very often we find this too bright so we hardly use this light unless we have to wash toilet, squeeze pimple and etc. 

If not most of the time we will use the dim light. Especially when in the morning or after a hard day of work, dim light provides you a more cosy and warm feeling to make you feel more relax. 

Master Bedroom


This is what you will see before entering the master bed room. The master bedroom toilet is on the right hand side. 


The light at the entrance of the master bed room is from Tao Bao.


Making a left turn and that's where our bed are. 


A closer look. Our little cozy area.


Before we sleep, we usually on this cove lights to use our phones and etc. 

This is the cove lights which I mentioned earlier, they are the same as those in the toilets. We had 2 bed side build in cabinet and there's additional power supply and also a 2 way switch at each of our bed side cabinet. So either one of us can off the lights. 


As you can see, the wadrobe is used as a divider/partition so that when one is changing his/her clothes, the other one who is still sleeping would not be affected. It also help block the lights coming from the master bed room toilet. 

The theme of the masterbedroom is to make it as dark as possible but still keeping brown as the main color. 

Master Bedroom Toilet


- Shower Screen done by ID

- Toilet paper holder from Tao Bao

- The rest of the sanitary fittings are by HDB


- The dim lights are the same LED strips used in guests toilets.


We didn't take down the sanitary fittings from HDB, but instead we add on this 2 suspended cabinets in our toilet  to store our stuffs.

The stickers from from Tao Bao too. Initially, we wanted to paste the sticker on our toilet bowl but the shape of our toilet bowl doesn't really match. So in the end, we paste it here lol.

Guests Room


We only did up the window blinds and bayside window storage for this room. It's currently used as a ironing room/hang clothes room.

The passageway in the house..


And last but not least, hereby introudcing the..

Leisure/Study Room


How it look like from the outside..


The blue wall area belongs to Derp.

- Suspended TV console, build in computer desk and top hung cabinet done by our ID

- One Piece Wall stickers from Tao Bao

- The soft carpet on the floor from Tao Bao

Basically, the concept of this room is to make it as fun as possible. We chose the blinds to be purple so as to blend in with the blue and pink.

Honestly speaking, I think we are very daring and it just come to us one fine day to decide on having 1 wall painted pink and the another painted blue. Since in our whole life, I never have a pink wall and same goes for Derp who never have a blue wall lol.

Everything is blue,pink as they are our individual favourite color.


This is my side! 

- Bean Bag cover from Tao Bao. Beans are being bought locally.

- Rilakkuma wall stick from Tao Bao

- One piece sticker on the glass door from Tao Bao

On the another side of the room..


Our collection haha! Actually this is not the full collection, I've still got some left in my old place. 


Close up of it. 

Most of our guests are brighten up by the view of this actually haha! It's fun in the sense they can see all this when they enter my house. All these collection definitely attracts their attention and brings a smile to their face.

One last photo of our living room..


And indeed, the decision to hack away the wall to make it into glass was one of the best decision made. The whole area looks bigger but yet not compromising the room to be part of the living room or the other way round.

This shall be the last entry regarding my house! I do hope I've not missed out anything and I hope all these posts are useful to people getting their keys soon. The links for other blog entries regarding my house are below as well as the various links!

Feel free to email me if there's anything else you will like to know and I'll try my best to reply :)

Related blog entries to my flat:

My New Flat: Getting the keys
My New Flat: Checking the Defects and Having them Rectified
My New Flat: Starting the Renovation
Renovation Week 1
Renovation Week 2
Renovation Week 2
Renovation Week 4
Commonly asked questions about home renovation

Living Room:

T5 Cover Lights for Living Room - http://detail.tmall.com/item.htm?id=20829815377&spm=a1z09.2.9.163.Fzfi3E&_u=d1si6bjmaf75

Sparkling/Diamond down lights for Living Room and Masterbedroom Entrance - http://detail.tmall.com/item.htm?spm=a230r.1.14.24.RCoyE1&id=19990554073&abbucket=1&_u=d1si6bjm81bb

LED Strip Lights - http://item.taobao.com/item.htm?spm=a1z09.2.9.207.FJf6a9&id=14073725594&_u=d1si6bjme467

Grass Sticker for Electrical Box - http://meaka.taobao.com/shop/view_shop.htm?spm=a1z09.2.9.20.sfYXpr&user_number_id=1816829672&v=1

DIY Tree in Living Room - http://item.taobao.com/item.htm?spm=a1z09.2.9.174.erhKqU&id=4601446061&_u=d1si6bjm8f69 ,

DIY Tree Branch above Dining Table -  http://item.taobao.com/item.htm?spm=a1z09.2.9.174.erhKqU&id=4601446061&_u=d1si6bjm8f69

Leisure Room/Study Room:

Bean Bag Cover - http://item.taobao.com/item.htm?spm=a1z09.2.9.177.FJf6a9&id=18156269040&_u=d1si6bjmb933

Rilakkuma Wall Sticker - http://item.taobao.com/item.htm?spm=a1z09.2.9.13.sfYXpr&id=20037197484&_u=d1si6bjm7c1e

One Piece Sticker on Glass Door - http://item.taobao.com/item.htm?spm=a1z09.2.9.109.VKY7rz&id=37562980755&_u=d1si6bjm0a7b

One Piece Sticker on Wall - http://item.taobao.com/item.htm?spm=a1z09.2.9.101.VKY7rz&id=37541151867&_u=d1si6bjm47b3

Soft Carpet for Leisure/Study Room - http://huaxu.tmall.com/shop/view_shop.htm?spm=a1z09.2.9.98.erhKqU&user_number_id=1129549036&v=1

Toilets: 

Towel/Clothes hanger/ Hair Dryer holder - http://store.taobao.com/shop/view_shop.htm?spm=a1z09.2.9.65.Fzfi3E&user_number_id=702207566

Service Yard: 
Rilakkuma Laundry Bags - http://item.taobao.com/item.htm?spm=a1z09.2.9.180.VKY7rz&id=14768629124&_u=d1si6bjm6212

Curtains/BlindsHome Curtains and Blinds