
Alright this post were meant to be up last year because I made my own Beancurd Tart around Oct/Nov period. Pardon for the delay! For those who have my FB/Instagram would have already seen it way back then, oh well life's still busy even after the customary wedding is over.
Nevertheless, I shall share recipe I used to make Beancurd Tart and also my personal experience.
The very first time I did the Beancurd Tart, it was a ultimate failure. I used those ready-made tart crust from phoon huat and to my horror, I bought the wrong type -_-". The tart crust was meant for Portuguese Eggtart (cripsy cripsy kind) and the tart crust don't taste similar to those being sold outside. I think I sort of under-cooked it. Anyway, I threw all away(even though the beancurd part was successful) on the first attempt.
Oh well, when it comes to baking, it really needs lots of patience just to get it right and with that I meant by attempting it again and again.
I continued searching for recipes online and I came across quite a few recipes which involves making the tart from scratch. It doesn't seems difficult hence I attempt to do the tart myself this time round then.
Here's the recipe for the tart crust adapted from: http://mymindpatch.blogspot.sg/2014/08/soya-milk-tart.html
Ingredients
90g unsalted butter, softened
45g icing sugar
30g beaten egg
150g all purpose flour
20g corn flour
1/4 tsp salt
Instructions
1. Loosen all purpose flour, corn flour and salt by stirring with a hand whisk.
2. Cream the softened butter till it becomes pale yellow. Add in the icing sugar and whip for about 5 minutes into a light cream.
3. Slowly add in the beaten egg and mix well.
4. Fold in the flour mixture from (1) using an spatula till the mixture turns into a soft smooth dough. Transfer the dough into a plastic bag and shape into a long dough. Let it chill in the fridge for 1 hour before moulding.
Avoid over mixing which will result in a tough crust.
5. Divide the dough into 12 equal portions.
Just some side information, I used a hand whisk throughout.
Anyway, I used Method 1 to create the tart shape instead of Method 2 as I do not have a cookie cutter at home.
Anyway, I used Method 1 to create the tart shape instead of Method 2 as I do not have a cookie cutter at home.
1) Roll the dough into a ball and place inside a 7cm round mould.
2) Use your thumbs to press the dough to shape to the contour of the mould.
3) Scrap off the extra dough.
4) Use a fork to prick some holes at the base.
5) Bake the tart shells in a preheated oven set at 180 degree Celsius for about 15 to 18 minutes, or till the tart shells turns slightly golden.
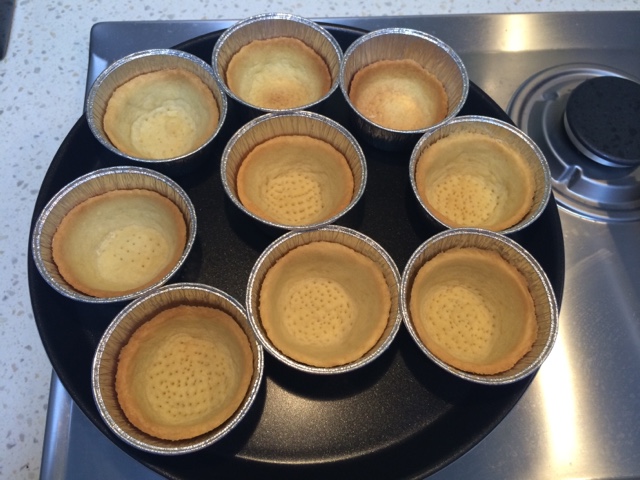
So that's how my tart shell look like after baking..

They smells really good. To be exact, it smells like baking biscuits :)

Derp and I took a few bites to try and we were very satisfied with the taste and texture.
All the crust made that day.
Much excited because it was a success. I was more motivated to continue making the beancurd part then because I'm half way there
Moving on to making the beancurd ...
Again, the recipe was adapted from: http://mymindpatch.blogspot.sg/2014/08/soya-milk-tart.html However, I did made some modification to it because I do not have all the ingredients stated if not different ingredient being used to substitute it.
Here it goes..
Soya Curd Filling
It is recommended to use those non-refrigerate types of carton soya milk. From my past experience, those soya milk which need refrigeration, have problem coagulate using this recipe. -> I used Yeos Soya Milk(those 1 litre type, costs around $1 if I never remember wrongly)
Ingredients
450g low sugar soya milk
10g sugar
1 tbsp milk powder ( I didn't use this as I do not have any milk powder at home)
1/2 tsp agar agar powder (I used instant jelly powder from Phoon Huat)
50g low sugar soya milk
1 pandan leaf (optional) (I didn't use this too)
Instructions
1. Heat 450g soya milk in a pot at medium low heat.
2. In a bowl, mix milk powder, sugar and 1/2 tsp of agar agar powder together. ->As I mentioned earlier, I omit the milk powder and for this step, I add in roughly 2 tsp of the instant jelly powder.
3. Pour 50g of soya milk to mix with the mixture in (2). Let the mixture stands for about 10 minutes to allow the agar agar powder to absorb the moisture.
4. Pour the mixture from (3) into the pot of hot soya milk. Stir regularly to facilitate the sugar and agar agar powder to melt. The agar agar powder will melt around 100 degree Celsius. Ensure there is no tiny grains of undissolved agar agar to give a smooth texture curd.
You may add in a piece of pandan leaf to enhance flavour.
5. To test whether the mixture is ready, scoop a tablespoon of the soya milk mixture to a cool saucer. Place the saucer in the fridge to chill for 2 minutes. If the mixture coagulate after 2 minutes, you can stop heating the mixture.
6. Pour the warm mixture into the tart shells and allow them to cool to room temperature before transferring to the fridge to chill.
7. Allow the tarts to chill for 15 minutes. The tarts are best consumed about 5 ~ 10 minutes after leaving the fridge :)Keep the unconsumed tarts in a closed container to prevent the bean curd from drying up.
Just to take note, how 'q' you want your beancurd part to be depends on how much instant jelly powder/agar agar powder you add. Initially, I only added in 1/2 tea spoon jelly powder and they don't coagulate that well.
Hence I had to slowly add in till I get the texture(making sure they harden after it's being placed in the fridge). No harm adding in a little more rather than not enough because those powder needs time and heat to be dissolve.

After pouring the filling into the tart..

Before putting them in the fridge :)

The overall taste was good (especially the crust), texture of the beancurd can be improved as I find it to be slightly too soft but I'm glad they did 'harden' up. Perhaps I've to experiment putting in more instant jelly powder so as to get the texture right.
That's all for the beancurd tart making process :) I'll need more time to perfect the tarts and if I ever did it, I will share it here then! I personally feel beancurd tart is a manageable homemade dessert for beginners. So do try it if you are like me who loves beancurd much! Who doesn't right? :)
No comments :
Post a Comment